Globus
Introduction
Globus is an infrastructure designed for managing data, potentially among multiple institutions. At Virginia Tech, ARC maintains an institutional Globus Subscription and hosts a Globus Connect Server (GCS) which provides a Globus endpoint for ARC’s /projects directories. Among other features, Globus provides fault tolerance for (large) data transfers.
VT’s Subscription Level
VT has subscribed to the High Assurance tier to help enable the transfer of Protected Health Information (PHI), Personally Identifiable Information (PII), and Controlled Unclassified Information (CUI) data. This allows VT entities to host Globus Connect Servers and designate collections as on enabled servers as “HA”.
In addition, individuals may create personal Globus accounts and use Globus Connect Personal (GCP) on ARC systems or other platforms if they have their own Globus license.
Getting Started with Globus
Log in to Globus: Confirm that you can log in to the Globus Web Site, https://globus.org. If you do not already have a Globus account, you will need to create one and associate your VT credentials with the Globus account.
Enable Globus for your ARC project: If you plan to use Virginia Tech ARC’s Globus license, you must enable Globus sharing for your
/projectsdirectory. The owner (usually the PI) of the/projectsallocation can do this through ARC’s ColdFront allocation management system. Use the steps and screenshot below as guidance:Open your project storage allocation in ColdFront.
Check the box for “Share via Globus” and click Update.
The change takes effect immediately.
File and directory permissions for your ARC project: Even if you enable your
/projectsdirectory to share files using Globus via ColdFront, you still control permissions on your files and directories. That is, you still have control over the directories and files within your/projectsdirectories that are accessible by Globus. So, for example, you can make invisible files that you do not want to be copied from your area using Globus by unsetting the read bit; and you can ensure that a file does not get overwritten using Globus (when copying a file into your/projectsarea) by unsetting the write bit on that file. (These file permissions bits are set and unset using the Unixchmodcommand.)

When transferring data with Globus, at least one endpoint must be covered by an active Globus subscription (institutional or personal license).
- If your institution already has a license, you can transfer directly to `/home` or `/projects` using Globus Connect Personal (GCP).
- If you intend to use Virginia Tech ARC’s Globus license, the ARC endpoint must be `/projects`, and it must be enabled in ColdFront as described above.
Transferring to/from ARC using VT ARC’s Globus license (/projects)
If you plan to use VT ARC’s Globus license, transfers are only supported to the /projects directory with “Share via Globus” enabled (as described in the Prerequisites section). Once enabled, any member of the associated project group can:
Log in to https://globus.org
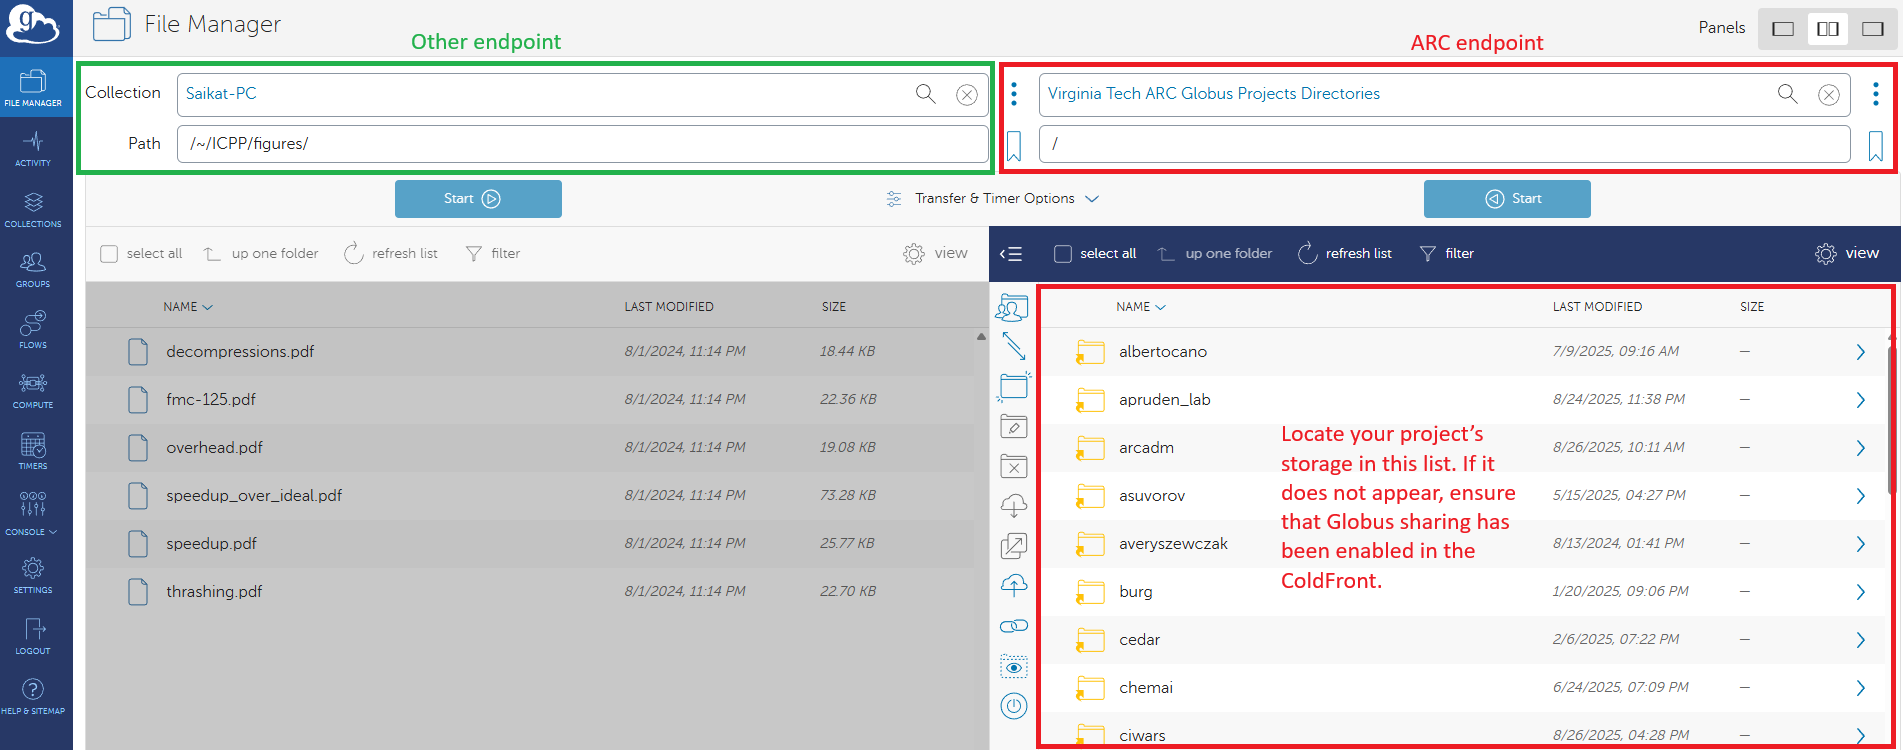
In the File Manager, search for “Virginia Tech” to locate the “Virginia Tech ARC Globus Projects Directories” (GCS) collection. Select this collection, and the shared directory will be visible.
All
/projectsdirectories with “Share via Globus” enabled will appear.Access permissions remain restricted to project group members, the same as on ARC clusters.
Transfer files between your
/projectsdirectory endpoint and another endpoint. The other endpoint can be any GCS or GCP endpoint and does not require a license, since you are using VT ARC’s Globus license. (If you are not seeing two endpoints as in the graphic immediately below, go to the “Panels” area at the upper right and choose the middle of the three icons.)
Transferring to/from ARC using own Globus license
If you plan to use your own Globus license, you can transfer data to both /home and /projects directories using Globus Connect Personal (GCP).
Globus Connect Personal (GCP)
Before installing GCP, it is highly recommended that you do the following:
Log into Globus via a web browser and navigate to the screens give above. This ensures your basic account is functional.
If you already have a GCP installed from your previous time at another institution, and you are now at VT (e.g., have moved your Globus account to your VT identity), then you MIGHT (you need to weigh the pros and cons) want to delete your installation of GCP on your laptop and do a fresh GCP install. IF you decide to do this deletion, then reboot your local machine before installing GCP (see below).
GCP can be used to connect a device or storage location you own to the Globus network.
For example, you can make your /home/<username> or /projects/<groupname>
group-shared directory accessible to you when you log into the https://globus.org web application.
GCP also enables you to move files between your personal/work computer and ARC clusters.
When install GCP, please think about the name you give your GCP instance because
that name will show up in your “Collections.”
You can then browse, upload, download, and coordinate transfers among other
collections in the Globus web application.
Detailed information on using GCP is available on
the Globus website: (1) for command-line instructions, see
GCP Via Command Line,
or (2) for UI-based instructions, see GCP Via UI.
Optimizing file transfer performance
Filesets with “Lots of Small Files” (LoSF) are the worst-case scenario for most file systems and transfer tools. For stability and performance, it is best to package such LoSF filesets into archives using tools such as tar. Attempting transfers of LoSF filesets via Globus can cause very poor performance and faults such as ENDPOINT_TOO_BUSY.